


WARNINGS
- The Ranga Grips™ roof safety bracket must be installed as per these instructions to ensure correct fitting and OHS requirements are met.
- If used in wet conditions a grip tape applied to the wooden batten is advised to provide additional grip for the user.
- The Ranga Grips™ roof safety brackets do not replace the need to have a harness on site and are not designed to be a harness attachment point.
- The Ranga Grips™ roof safety brackets have been coloured orange to be visible and to limit and try to prevent a tripping hazard when installed. We advise to remember and consider all risks before installing and to remember that the brackets have been created to increase secure footing only.
- Please be advised that in all jurisdictions of Australia, a Safe Work Method Statement (SWMS) is required to be prepared before commencement of any high risk construction work on a construction project. In respect of the installation and use of the ‘Ranga Grip’ product, this requirement is applicable where it involves a risk of a person falling 2.0 meters or more (3.0 meters in SA)
- All Ranga Grips™ roof safety brackets come with new tape to the underside of the bracket to try and prevent damage to the roof cover. We advise that this tape be inspected regularly before use to ensure limited damage to existing or new roof material. if the tape is damaged we advise it be replaced with a suitable alternative. Please be advised that we do not replace the original tape.
- It is the operators responsibility to ensure the protection of the roof structure and advise using material that will not scratch, dent or cause any damage to the immediate or surrounding structure. This includes ensuring the replacement of rubber washes to screws if original fixtures require replacing.

STEP 1

STEP 2
Slide in the Ranga Grip™ with the roof fixing on the high side of the roof, lightly tighten the roof screw back down onto the bracket top surface (rubber seal in contact). SEE NOTE 1
Step 3
Slide in the wooden batten 35mm x 70mm.

Step 4
Use supplied fixing(s), i.e. Tek screw(s) TYPE 17x25mm, to secure wooden batten to bracket(s).
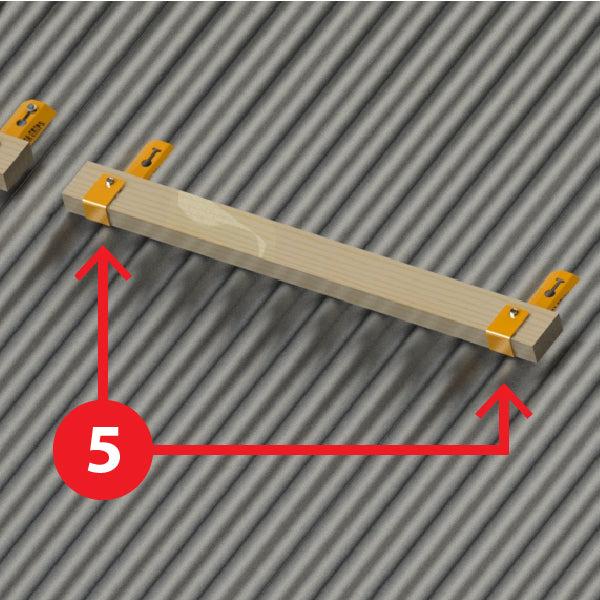
Step 5
Use two Ranga Grips™ per wooden batten, maximum recommended Ranga Grip™ spacing is 1200mm horizontally (as per roof retaining screw spacings). SEE NOTE 2

NOTE 1
If the roof screw is insecure in the roof batten (i.e. wood is old and soft or if the screw in the steel batten hole is oversize) (if the existing screw is damaged in any way) replace the screw in this location or ensure that additional brackets are used to ensure the tread is secure in all locations.
NOTE 2
Larger spans between brackets, such as 2400mm, can be used but deflection of the wooden batten at the centre may make use uncomfortable, so match the bracket spacing to roof screw spacings and remain below 2400mm is our recommendation. Remember to always check the timber for knots or any weak points before installing in bracket. We advice to use minimum 70mm x 35mm mgp10 free of any knots of defects.